Last updated on January 20th, 2022 at 09:29 pm
As you already know, car radiators leak and one of the easiest ways to tell that there’s a leak is when you consistent low coolant level or when there’s a green radioactive looking puddle under your vehicle. You may also love this post on some of my best homemade radiator flush using items you already have at home.
Sometimes this can be difficult, but repairing this issue can be simple.
How To Fix A Radiator Leak With J-B Weld
Step 1- Empty the radiator:
For you to easily do this, ensure your engine is not hot, allow it to cool for several hours.
Also, ensure your battery is disconnected and your engine is covered with a blanket to prevent splashing.
You should unscrew the radiator cap to allow airflow and put your container below the radiator plug.
Take off the plug and allow the fluid to drain until it stops dripping.
Step 2- Wipe off the area where the leak is located:
Thoroughly wipe off the area where the leak is located. You can still scrape off the rust and other debris away, and ensure you remove any grease, grime or dirt using a rag and solvent.
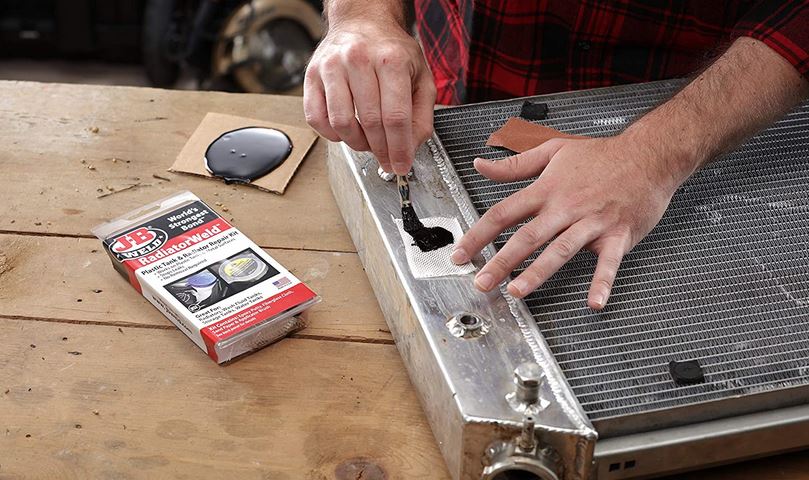
Step 3 – Mixing the J-B WELD:
You can now mix equal parts of the black and red tubes (J-B WELD) which is on your disposable plastic surface with your wooden tool. Note that J-B WELD sets very fast, so ensure you’re quick.
Step 4
Spread the mixed J-B WELD throughout the leak area liberally with the wooden tool.
Once done, the mixture will set in about 4 to 6 hours and be completely cured in 15 to 24 hours.
Step 5
Change the radiator plug which you will find on the bottom of the radiator and then refill the fluid to the appropriate level.
Change the radiator cap and take off the blanket on the engine. Now reconnect your battery and start your vehicle.
Can You Put JB Weld On A Radiator?
Off course you can! As you know, a radiator is very hot and most vehicles run at about 15 lbs pressure.
Also, it happens to be a plastic tank and radiator repair kit meant for temporary or permanent repairs on both metal and plastic radiators.
Related Articles:
- 5 Best Radiator For Classic Mini (Classic Mini Fletcher Radiator Review)
- Why Is My Top Radiator Hose Hot And Bottom Cold & Upper Radiator Hose Cold As Well
- Jeep Grand Cherokee Radiator Replacement Cost
- How to Fix Radiator Leak with Epoxy + 3 Best Radiator Repair Epoxy
Which JB Weld Is Best For Radiator Repair?
The J-B Weld 2120 Radiator and Plastic Repair Kit
Here’s a handy packaged radiator stop leak that’s very good and inexpensive. It is a product from J-B weld which provides users an effective solution to leaks on radiators.
This product gives you a permanent repair if there are small fractures and leak spots on your radiator.
The product also helps in preventing rust and corrosion which helps in protecting the radiator.
The features:
- It will save you a lot of money on repairs as its very cost-effective
- It’s very simple to use, quick and it’s a permanent solution
- It has rust and corrosion preventive
- Comes with water lubricant
One of the reasons people like this product is that it’s inexpensive, which makes it a perfect option for small radiator repairs.
This product will save you money and provide you with lasting protection to help prevent further issues in your engine components.
Please watch this video above to see how you can use it and to get the J-B Weld 2120 Radiator and Plastic Repair Kit you can it here
How To Fix A Cracked Radiator Plastic
If you’re having a leak coming from your radiator, then here are the steps to fix it.
Step 1 – Find the Crack:
In case you don’t know, one of the easiest ways to find a crack in the radiator is to allow your engine to run until the temperature is normal high.
Note that it might take at least 30 minutes before pressure builds up.
Now you should shut off your engine so that the pressure forces out the coolant from the crack.
Now mark the cracked area using tape or a marker. Now you can wait for the tank to cool down and take the cap off.
Examine if the crack is below or above the coolant level. In case it’s below, then drain some coolant until when you notice that the crack is above the coolant level.
With a drain tank cylinder, make sure you drain the radiator tank. However, ensure that you have a new coolant to replace once you finished repairing the crack on the radiator.
Step 2 – Preparing the radiator crack area for repair:
To do this, you should clean the crack using a toothbrush and dry the area. You should pour a little acetone on the toothbrush and begin to scrub the crack and its surroundings.
Keep scrubbing until the area is dry and there’s no more moisture on the surface once the acetone dissipates.
Hold a hairdryer close to the crack to dry the areas. Note that moisture will resurface again, but you should keep blowing the crack until the area is completely dry. You should scrub and dry the area one more time.
Step 3 – Continue the repair:
Put the soldering iron on the tie until it starts to melt, working as a sealant. Put and press the tie to wrap into the crack. Now move slowly around the cracked area, making sure it melts well enough to seal the crack. Continue melting the area until the tie and its adjacent areas turn into a hot liquid.
Keep doing it until you have melted the entire crack as you wait for the liquid to harden.
Now cut off all unused portions of the tie. It’s time to fill the radiator with coolant and complete a test to ensure that the crack is properly sealed.
With just little knowledge and elbow grease, you have been able to fix your cracked plastic radiator yourself.
How To Repair Plastic Radiator With Soldering Iron
Here are the needed steps:
- In case the fluid of your radiator is leaking out, drain it as the spot needs to be dry.
- The clean the spot that is leaking and remove any grease from the location. You can use WD-40 or any similar product to spray at the target which cleans it up nicely.
- Use a soldering to go along the leak to melt the plastic back together and seal it.
- Depending how big the crack is, the melting of the plastic needs to be done accordingly.
- Once you have melted the plastic, you need to test it to see if it’s still leaking. This is the only way to know if you have fixed it.
What to Read Next: