Knowing how to replace a torque converter is essential when dealing with transmission problems in automatic vehicles. A failing torque converter can cause slipping, overheating, or shuddering during gear shifts. Replacing it involves removing the transmission, detaching the old converter, and installing a new one with proper alignment. Though it’s a challenging job best done with the right tools and mechanical knowledge, it can restore smooth operation and extend your transmission’s life. This guide will outline the key steps to help you complete the replacement safely and efficiently.
Preparing Your Vehicle For Torque Converter Replacement
Before diving into the technical steps of replacing your torque converter, it’s crucial to prepare both yourself and your vehicle for the job. First, ensure that you have all the necessary tools at your disposal, such as a jack, jack stands, wrenches, and a torque wrench. You’ll also need the appropriate replacement torque converter for your vehicle model and transmission type.
Safety should be your top priority. Work in a well-lit, well-ventilated area, and wear safety gear such as gloves and eye protection. Make sure to have ample space around your vehicle and tools to allow for free movement during the job.
Step 1: Disconnecting The Battery And Draining Fluids
The first crucial step in replacing a torque converter is disconnecting the battery. This step prevents any electrical shorts or accidental airbag deployment while you work under the vehicle. Once the battery is disconnected, you should drain the transmission fluid. This ensures you avoid any spills or mess when removing the transmission pan later in the process. Keep in mind that the drained fluid will need to be disposed of properly, as it is hazardous to the environment.
Next, drain any additional fluids that could interfere with the job, such as the engine coolant. By draining the fluids, you minimize the risk of contamination and ensure a clean workspace for the replacement process.
Step 2: Lifting And Securing The Vehicle
With the fluids drained, the next step is to lift your vehicle. Use a reliable jack to raise the vehicle high enough to allow for easy access to the underside. Secure the vehicle with jack stands to ensure it remains stable throughout the procedure. Never rely solely on the jack to support the vehicle; this is crucial for your safety.
Make sure the vehicle is level and adequately supported before you begin the disassembly. If your car is a four-wheel drive, you may need to engage the parking brake and wheel chocks to prevent any accidental movement.
Step 3: Removing The Transmission Pan
Now that the vehicle is secured, it’s time to remove the transmission pan. This step involves unbolting the bolts securing the pan to the transmission housing. Depending on your vehicle model, the transmission pan may be sealed with a gasket or RTV sealant. Use a rubber mallet or gentle tapping with a hammer to break the seal, if necessary, and carefully remove the pan.
Be cautious when handling the pan and its contents, as some remaining fluid may still be inside. Inspect the pan and fluid for signs of metal debris or shavings, which could indicate internal transmission damage.
Step 4: Detaching The Driveshaft And Transmission Mounts
Next, you’ll need to remove the driveshaft and detach the transmission mounts. Begin by locating the driveshaft, which is typically held in place by U-joints or bolts. Use a wrench or impact tool to unbolt the driveshaft from the rear axle or differential. Keep track of the bolts and components to ensure proper reassembly later.
Once the driveshaft is removed, locate the transmission mounts. These mounts secure the transmission to the vehicle’s frame. Carefully unbolt and remove them, making sure to support the transmission with a jack to prevent it from dropping once the mounts are removed.
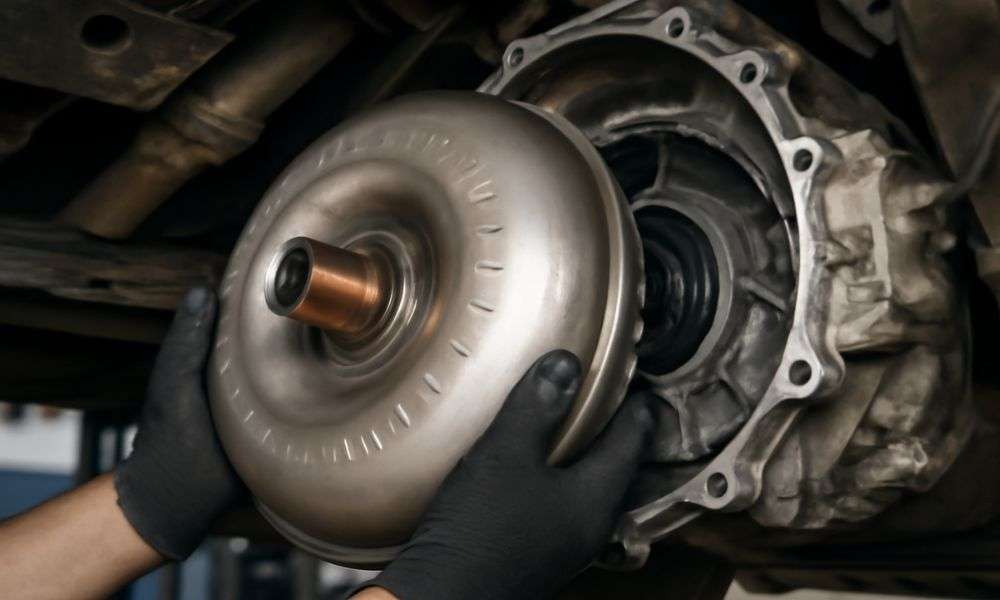
Step 5: Unbolting And Removing The Torque Converter
With the transmission properly supported, you can now focus on the torque converter. The converter is bolted to the flex plate, and these bolts must be removed carefully. Depending on your vehicle’s design, you may need to rotate the engine using a socket on the crankshaft pulley to access all the bolts.
Once all the bolts are removed, gently pull the torque converter away from the transmission. If the converter is stuck, gently tap it with a rubber mallet to loosen it. Be cautious during this step to avoid damaging any components, as the converter is crucial to the proper functioning of the transmission.
Step 6: Installing The New Torque Converter
Now it’s time to install the new torque converter. Begin by aligning the new converter with the transmission input shaft. Gently slide the converter into place, ensuring it fits snugly without forcing it. The converter must be seated correctly to prevent damage when the transmission is reassembled.
Once the converter is in place, rotate it by hand to ensure that it rotates smoothly and that there are no obstructions. This is a critical step; if the torque converter is not seated correctly, it may cause shifting problems or transmission damage in the future.
Step 7: Reattaching The Transmission And Bellhousing
With the new torque converter in place, you can now reattach the transmission to the engine. This step involves carefully aligning the transmission with the bellhousing and bolting it back into position. Ensure the transmission is securely mounted, and take care to tighten all the bolts in a crisscross pattern to ensure even pressure distribution.
If your vehicle has a torque converter that requires specific torque settings, be sure to use a torque wrench to achieve the manufacturer’s recommended tightness. Reattaching the transmission is a pivotal step that ensures the torque converter operates correctly.
Step 8: Reinstalling The Transmission Pan And Sealing Properly
Once the transmission is securely reattached, it’s time to reinstall the transmission pan. Before doing so, inspect the gasket or RTV sealant and replace it if it shows signs of wear. Place the new gasket or apply fresh sealant, then position the transmission pan back in place.
Bolt the pan securely, ensuring that all bolts are tightened evenly. Be cautious not to overtighten the bolts, as this can cause the pan to warp or the seal to break, resulting in leaks.
Step 9: Refilling The Transmission Fluid
With everything back in place, it’s time to refill the transmission with fresh fluid. Refer to your vehicle’s manual to determine the appropriate type and amount of fluid. Use a funnel to pour the fluid into the transmission, checking the fluid levels regularly as you go.
Be sure to check for any leaks around the transmission pan, bolts, and torque converter area. If you notice any leaks, stop the fluid refill and address the issue before continuing.
Step 10: Lowering The Vehicle And Testing The Torque Converter
Finally, lower the vehicle slowly and carefully from the jack stands. Once the vehicle is stable on the ground, reconnect the battery and start the engine. Allow the engine to run for a few minutes to circulate the transmission fluid, then shift through all the gears to ensure smooth operation.
Check for any unusual noises or behavior from the transmission or torque converter. If everything functions properly, take the vehicle for a test drive to ensure the torque converter is working as expected, providing smooth shifts and power transfer. If any issues persist, revisit the installation steps to ensure everything is properly installed.
How to Replace A Torque Converter Clutch Solenoid
Enter the torque converter clutch solenoid, a small chunk of metal and plastic junk that shakes hands with your shifting in an automatic transmission vehicle. It controls how power is transmitted from your engine to the wheels. But over time, this little component can wear out and cause all kinds of problems, such as jerking between gears or slipping. Replacing it? C6 Overhaul Kit 76-96 w/Steels and Transtec Gaskets and Rings – See More Info
Step 1: For safety, disconnect the vehicle’s battery. The last thing you need when your hands are covered in gunky transmission fluid is a surprise.
Step 2: Find the solenoid. It is typically located on the flywheel or flexplate and next to the transmission. You may need to drop the transmission pan in some cases for a good look.
Step 3: As you identify it, unplug any wiring. Take out the old solenoid and look for any clips or connectors that you have to pry off.
Optional Step 4: When you are sure that the condition of your solenoid is bad, please remove and replace the old solenoid. Be sure to align it with its socket carefully and snugly.
Step 5: Reattach the wiring and reinstall the transmission pan. You’re almost there. Just test-drive the vehicle to ensure that the solenoid is doing its job. Smooth shifts? Victory!
How to Install a Torque Converter on a Flexplate
Your flexplate is the link between your engine and your transmission. It’s the mounting base for the torque converter. Properly installed, your converter will sit beautifully and you won’t have to concern yourself with such future annoyances as vague vibrations and looseness. Here’s how you do it.
Step 1: Verify the state of the flexplate. If it’s cracked or worn, this is when to replace it before proceeding.
Step 2: Slide the torque converter onto the flexplate while ensuring that it lines up with the input shaft of the transmission. You’ll experience a bit of resistance when it’s in all the way. If it’s not going, do not force it: Maybe you need to align something.
Step 3: Spin the converter in a little bit in case it wasn’t seated quite right. Next, bolt that in and tighten the bolts to exact torque specifications (found within your vehicle manual). A false step here could upset the equilibrium.
Step 4: Double-check everything. You don’t want anything getting loose down the road.
How to Install a Torque Converter in a 4L60E Transmission
The 4L60E, which is in so many GM automobiles, requires a gentle hand. It’s not an “easy install,” but with care and preparation, you should get that right.
Step 1: Raise the vehicle and clear any objects so that you can work at removing the transmission cleanly and comfortably. We’re discussing exhaust pieces, drive shafts, and anything that happens to be in the way.
Step 2: Once the transmission is exposed, take out the old torque converter. Note the retaining scews.
Step 3: Gently replace the new torque converter’s position. Quads are good, get everything ramped up and nothing but thumping. Make sure it gets to the transmission pump and input shaft all the way in, though. It seems to slide in well, but do not try to force it.
Step 4: Turn the converter to snug up against the bell housing. Torque the retaining bolts to the acceptable value.
Step 5: Reassemble any of your removed parts and take a quick test run. Ensure that the torque converter is functioning properly.
How to Replace the Torque Converter in a Toyota
Replacing the torque converter in a Toyota is similar to that onion peeling analogy; it’s layered. The steps may differ slightly, based on your model and year. Here’s the general approach.
Step 1: Unplug the negative battery terminal and jack up your car (wheels removed) for better reach.
Step 2: Slide under the vehicle and find the transmission; remove its bolts securing the transmission and torque converter. There may be a couple of additional parts that you need to take off before the converter is fully exposed.
Step 3: For some Toyota models, it might be necessary to separate and remove the transmission from the engine to be able to access the torque converter better.
Step 4: With the torque converter exposed, bolt it away from the flexplate. Use care to take it off and put the new converter in.
Step 5: Make sure the flexplate is mated correctly with the input shaft and tighten everything down good and tight. Don’t forget to verify the fluid levels before putting your transmission and everything else back together.
Can I Change a Torque Converter Without Pulling the Transmission?
In a few vehicles, you can it’s complicated to change a torque converter without pulling out the entire transmission. It’s like a puzzle to solve, and every single move has meaning.
Step 1: Jack up the vehicle and remove the bolts holding the torque converter to the flexplate and transmission.
Step 2: You need to be able to slip the torque converter off the input shaft without affecting it. Precision here is key.
This technique can be a time and effort saver, though if you’re not careful, you could damage adjacent parts. So take it slow and do the job right.
How to Change a Ford Torque Converter
For the vast majority of Ford vehicles, yanking out your transmission is a necessity when removing your torque converter. Here’s how to do it.
Step 1: Disconnect the battery and raise the vehicle. Be sure to have space so that all you need is at your fingertips.
Step 2: Drop the transmission pan and unbolt the driveshaft, exhaust system, etc, that are in your way.
Step 3: Remove the torque converter from the flexplate since it’s now accessible. The bolts might need to be lined up by turning the engine over by hand.
Step 4: Once the old converter is out, slide the new one into position, being sure that it is aligned with the input shaft and flexplate. Lock the bolts and torque them in.
Step 5: Install everything together and inspect the operation of the torque converter before attaching the driveshaft as well as the exhaust system.
Common Torque Converter Installation Mistakes
Installing a torque converter is not for the faint-hearted. It’s easy to make one misstep and derail the process altogether. Here are some of the most frequent mistakes to look out for:
- Not being Properly Centered on the Transmission Pump, the converter will not be properly centered and oriented with the transmission pump, causing poor flow of fluid, which results in overheating and burning out.
- Not Fully Engaging the Input Shaft: If the torque converter isn’t fully installed on the input shaft, it also will wear prematurely, and could ruin both itself and your tranny.
- Loose Bolts: If you overly-tighten or under-tighten these bolts, you’ll also end up causing damage to the flexplate, misalignment, and possibly even have your converter back out.
- Neglecting Fluid Checks: You should check your fluids when setting up your cooler. There is a danger of blowing the transmission due to low fluid levels.
How to Align the Torque Converter with the Flywheel
Having the torque converter’s bolts line up with the flywheel is crucial. This misalignment can be catastrophic for your transmission. Here’s how to nail it.
Step 1: Ensure the torque converter is fully installed on the input shaft and flexplate.
Step 2: Push the Converter toward the Flywheel and turn slightly to secure.
Step 3: Inspect the alignment and look for a consistent space between the torque converter and the flywheel. A d a j ust as required to ensure the centers of all are dead center.
Step 4: Tighten the bolts when they’ve been lined up. Make sure everything is correct before proceeding to the following steps.
Conclusion
The truth of the matter is that swapping a torque converter doesn’t have to be some ominous challenge if you tackle it one step at a time, with the proper tools and knowledge, your ride’s drivetrain should deliver thousands of worry-free miles. Whether it is a Toyota, Ford or 4L60E, following the procedure will ensure you do not accidentally bypass any of these crucial checks that are common mistakes made by many. Keep it sharp, check your work and see the car run without a hitch.